How to build a slideshow with a blinds transition using jQuery
The other day, I saw a photograph in a printed magazine which inspired me to create a JavaScript effect that would make any photo look exactly like that. After I created this effect, I altered the code into a proper transition effect to be used as a slideshow, using multiple images. I am now going to walk you through how it was built.
First of all, the effect I just mentioned, looked like this:
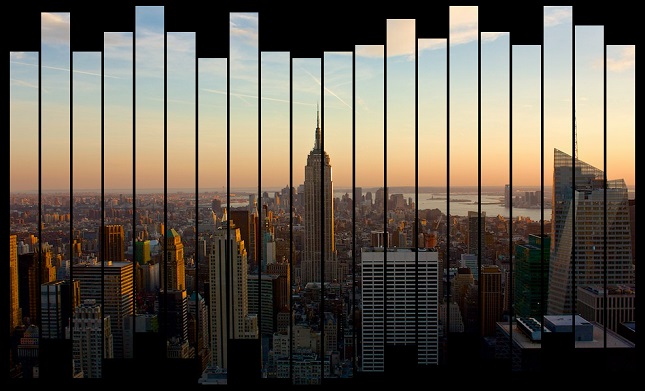
The transition I included treats each part of the photo as a blind, closes them all together, and when they are open again, a new photo is revealed underneath.
The HTML code…
…is very simple. It includes a container element, and an unordered list of images. An active class is added to the first list item, just to make sure that an image will be visible if JavaScript is off.
<div class="container" id="container">
    <ul>
        <li class="active"><img src="photo_1.jpg" alt="" /></li>
        <li><img src="photo_2.jpg" alt="" /></li>
        <li><img src="photo_3.jpg" alt="" /></li>
        <li><img src="photo_4.jpg" alt="" /></li>
    </ul>
</div>
The CSS code
Regarding CSS, we specify the position and overflow properties of the container, remove any styling from the ul and li elements, set the list items to be invisible (apart from the one marked as active), and finally specify a few properties of our the span elements which will act as blinds (I’ll get to that a bit later).
.container
{
    position: relative;
    overflow: hidden;
}

.container span
{
    -webkit-box-sizing: border-box;
    -moz-box-sizing: border-box;
    box-sizing: border-box;
    position: absolute;
}

.container ul, .container li
{
    padding: 0;
    margin: 0;
    list-style: none;
}

.container li
{
    display: none;
}

.container li.active
{
    display: inline;
}
What we’ll build
The effect is going to work as follows:
Only one of the images is going to be visible at a time. Our JavaScript code will add a number of span elements which are going to act as vertical blinds, and will be positioned absolutely above the visible image, so they can hide it. After a few seconds, the blinds will shut, the image will change, and they’re going to open again, in an endless loop.
Have a look at the demo, this pen, or the following gif, so the above can make better sense.

The JavaScript code
Now, the interesting part!
note: everything -apart fron two functions- will be included in a $(document).ready() function
First of all, we need to specify a few options:
var width = 960;
height = 538;
var numberOfBlinds = 20;
var margin = 2;
var color = '#000';
gapHeight = 100;
width and height refer to the dimensions of the images (which should all have the same dimensions); numberOfBlinds is self-explanatory; margin sets the distance between the blinds; color sets the colour of the blinds; and gapHeight sets the total height of the gap (will be used to create the uneven blinds effect).
Moving on, we set the width and height of the container to the values we just specified, as well as calculate the width of each blind.
var container = $('#container');
container.width(width).height(height);
var blindWidth = width / numberOfBlinds;
Next, we’re dealing with the images. We iterate through the list of images, storing them as jQuery objects in an images array. Then, we set the first image of the list as active (even though we specified it in the markup, in case we forgot), and initialise a value to keep track of which image is active.
images = new Array();
$('ul li', container).each(function() {
    images.push($(this));
});

images[0].addClass('active');
activeImage = 0;
In the last part of the code which is stored into the $(document).ready() function, we create the blinds.
Inside a for loop, we calculate a different value for the borders of each span element (i.e. a blind) using the calculateBorders function (we’ll get to that), and we’re setting their CSS values accordingly.
After each span is generated, it is prepended to the container. Finally, we store the selector of our span elements in a variable, and we instruct the browser to execute the animateBorders function (again, we’ll get to that) after a second (i.e. 1000 ms).
for (var i = 0; i < numberOfBlinds; i++) {
    var tempEl = $(document.createElement('span'));
    var borders = calculateBorders();

    tempEl.css({
        'left': i * blindWidth,
        border: margin + 'px solid ' + color,
        borderTop: borders.borderWidthTop + 'px solid ' + color,
        borderBottom: borders.borderWidthBottom + 'px solid ' + color,
        'height': height,
        'width': blindWidth
    });

    container.prepend(tempEl);
};

blinds = $('span', container);
setTimeout(animateBorders, 1000);
The calculateBorders function, chooses randomly a value between 1 and 9, and then uses it as a percentage to calculate the height of the top and bottom borders of each blind, based on the gapHeight variable we specified before, and returns the values as an object.
As an example, let’s say that the random variable is 3. Therefore, based on the gapHeight which is set to 100, the height of the top border of the blind is going to be 30, and the height of the bottom border 70.
function calculateBorders() {
    var random = Math.floor((Math.random()*9)+1);
    var borderWidthTop = (random / 10) * gapHeight;
    var borderWidthBottom = gapHeight - borderWidthTop;

    return {borderWidthTop: borderWidthTop, borderWidthBottom: borderWidthBottom};
}
Our last function is called animateBorders, and -surprisingly- is responsible of actually animating the borders, and performing the transition between the images. So, we instruct all the blinds to animate their borders to the full height of the container, thus hiding the image. In the callback of the animate function, we calculate the borders again (so they can change randomly), and after a small delay, we animate them again to their new values.
Last but not least, there is a small part of the code which is executed only once (although the animation and its callback occur for each one of the blinds). There, we remove the active class from the currently visible image, iterate the activeImage variable, adding the active class to the next image of the list, and finally, instructing the browser to run again the animateBorders function after 3 seconds (i.e. 3000 ms).
function animateBorders() {
    var changeOccuredOnce = false;

    blinds.animate({
        borderTopWidth: height / 2,
    	borderBottomWidth: height / 2
    }, 1000, function() {
        if(!changeOccuredOnce) {
            images[activeImage].removeClass('active');
            activeImage = (activeImage + 1) % images.length;
            images[activeImage].addClass('active');
            setTimeout(animateBorders, 3000);
            changeOccuredOnce = true;
        }

        var borders = calculateBorders();

        $(this).delay(300).animate({
            borderTopWidth: borders.borderWidthTop,
            borderBottomWidth: borders.borderWidthBottom
        }, 1000);
    });
}
That’s all for now
If you haven’t done it already, have a look at the demo (or this pen) to see what we have just created. You can also [download id=”17″ format=”1″].
But, there’s more to be done
The above solution is far from perfect, especially if you want to re-use this functionality in multiple situations. First of all, it would be mostly suited to be packaged into a jQuery plugin. Also, it could use a few more options (e.g. to be able to change the timing of the animations and the transition). Finally, we didn’t consider adding the ability to include links to each image.
The birth of the Blindify jQuery plugin
After coding and writing (but before publishing) the above tutorial, I decided to actually act on what I discussed in the previous section, so I packaged everything into a jQuery plugin, called Blindify. Everything is customisable, there is the option to include a global link or different links for each image, and there are two kind of blinds; vertical (like these described in this tutorial), and horizontal.
I’m still writing its documentation and building a few demos, so I haven’t uploaded it to GitHub yet, but I’ll make a new post about it when I do (hopefully very soon), so if you’re interested, consider subscribing to the blog (rss, email) to make sure you’ll be notified.
For any questions, suggestions, etc, please feel free to post a comment.