How to calculate the selection coordinates of a resized and rotated image

This tutorial derives from a question I recently answered in Stack Overflow. The person who asked the question was selecting (I assume using some JavaScript library) a part of an image that wanted to subsequently crop. Given that the selection was being made in a resized image, he had the coordinates based on that resized image, and he needed to know the way he could calculate the coordinates corresponding to the original image. Let’s tackle that first, and then we will move onto the rotation part which is mentioned in the title of this tutorial.
Before we begin, I have to note that many libraries/plugins which deal with image selection, such as the imgAreaSelect which I’ll use for the demo of this tutorial, provide a way to get the above coordinates without any calculations.
Now, for the rest of this tutorial, unless stated otherwise, we will take as granted that the aspect ratio of the original image remains the same after it is resized, and that the solution we are using for the selection returns the X & Y coordinates of the top left (which will be the x1 and y1 points) and bottom right (which will be the x2 and y2 points) edges of the selection rectangle.
The resized image
We will first need to know the original dimensions of the image, as well as the width of the resized image. There are several ways to do that using JavaScript, but it’s out of scope of this tutorial, so let’s say that you have them in the following variables:
original_width = 3888;
original_height = 2592;
resized_width = 700;
So, given that we have the coordinates of the selection in the variables x1, y1, x2, and y2, to calculate the coordinates of the selection for the original image, we merely have to calculate the resize ratio, and the multiply it with each of the coordinates, rounding the result so we won’t end up with decimal pixel values.
ratio = original_width / resized_width;
original_x1 = Math.round(x1 * ratio);
original_y1 = Math.round(y1 * ratio);
original_x2 = Math.round(x2 * ratio);
original_y2 = Math.round(y2 * ratio);
That’s all. You can find the proof of concept in this demo. Apart from viewing the calculated coordinates, you can validate they are correct since the preview area (underneath the resized one which we use for the selection purposes) uses as a source the original image.
Before moving on, let’s discuss one more case, where our image is resized without keeping its aspect ratio, becoming stretched in some dimension. In that case, we cannot use the global ratio that we used in the previous approach; we have to calculate two different ratios, one for the width and one for the height and then use them appropriately:
original_width = 3888;
original_height = 2592;
resized_width = 700;
resized_height = 300;

width_ratio = original_width / resized_width;
height_ratio = original_height / resized_height;

original_x1 = Math.round(x1 * width_ratio);
original_y1 = Math.round(y1 * height_ratio);
original_x2 = Math.round(x2 * width_ratio);
original_y2 = Math.round(y2 * height_ratio);
The rotated image
Having tackled the resized image issue, let’s move on to the follow-up question: How can we calculate the original dimensions of the image, if the image used for selection is not only resized, but also rotated?
In the example I’ll explain, the resized image will be rotated 90 degrees clockwise, but the principles are the same in other cases as well (i.e. rotation of 180 and 270 degrees).
To calculate the coordinates corresponding to the original dimensions of the image, we can use the approach described before, with one difference; since the image is rotated sideways, we need to use the original image’s height instead of width to calculate the ratio:
ratio = original_height / resized_width;
In case our image is resized without keeping its aspect ratio, the ratio calculations will become as follows:
width_ratio = original_height / resized_width;
height_ratio = original_width / resized_height;
After we have the original coordinates, the only problem left to solve is that the coordinates that we have correspond to the top right and bottom left edges of the selection rectangle when it is applied to the original image. To visualise that, have a look at the following figure:
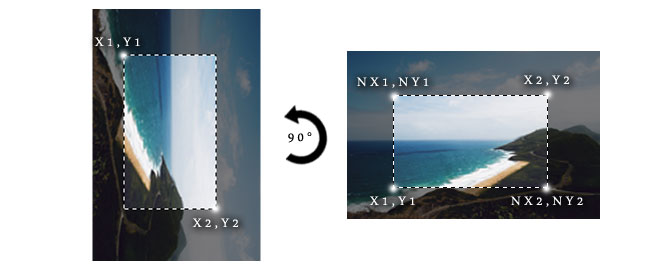
To calculate the edges we need, i.e. the top left one (coordinates NX1 and NY1) and the bottom right one (NX2 & NY2), we have to do the following:
new_x1 = original_y1;
new_y1 = original_height - original_x2;
now_x2 = original_y2;
new_y2 = original_height - original_x1;
As before, you can find the proof of concept in this demo. Apart from viewing the calculated coordinates, you can validate they are correct since the preview area (underneath the resized one which we use for the selection purposes) uses as a source the original image.
The preview area
Before ending this tutorial, it is worth explaining how the preview area works. Regarding markup and styling, it consists of two HTML elements; a div tag of fixed dimensions, and an img tag which has the original image as a source, scaled down to the same dimensions of its parent div.

.preview {
    width: 300px;
    height: 200px;
    overflow: hidden;
}

.preview img {
    width: 300px;
    height: 200px;
}
Then, packed into a function which is called every time a new selection is made, using the same principles as before, we have to calculate the width and height ratios that will help us to scale the dimensions of the selection and calculate which part of the original image should be displayed. Then, using some jQuery code, we are modifying the width and height of the image, as well as the top and left margins, so only the part of the image which corresponds to the selection will be visible.
preview_width_ratio = 300 / (ox2 - ox1);
preview_height_ratio = 200 / (oy2 - oy1);

$('#preview-img').css({
    width: Math.round(preview_width_ratio * original_width),
    height: Math.round(preview_height_ratio * original_height),
    marginLeft: -Math.round(preview_width_ratio * ox1),
    marginTop: -Math.round(preview_height_ratio * oy1)
});
That’s all! As a reminder, there are two available demos for this tutorial: one with a resized image, and one with a resized and rotated image.
Photo by Jorge Franganillo