How to resize a logo to specific dimensions keeping its aspect ratio using PHP
![]() I recently had a case in a B2B project I was working on where we wanted to allow users to upload their company logo, but resize them automatically to specific dimensions, while keeping the aspect ratio of the logo intact (and without cropping any part of it). Here’s how I tackled the issue.
I recently had a case in a B2B project I was working on where we wanted to allow users to upload their company logo, but resize them automatically to specific dimensions, while keeping the aspect ratio of the logo intact (and without cropping any part of it). Here’s how I tackled the issue.
Before I begin with the tutorial, I want to highlight that I’m talking specifically about a logo and not a generic image, since logos usually don’t come with a background, or more specifically they come either with a transparent, or a solid colour background (which -as you’ll see in a bit- is a requirement for what we want to accomplish).
To begin with, we will use a package called Intervention Image. You can easily install it using composer (it’s also easily integrated with Laravel if that’s your framework of choice). For the rest of the tutorial I’ll assume that you have it installed and configured.
To be able to test what we’re building, let’s create a simple form which will allow us to upload a logo:
Let’s put that in a file which we’ll call logo-resize.php (place it at the root of our project), which will also load composer’s autoload file, and for now let’s put just a simple placeholder check that will help us deal with the uploaded logo.
We’ll have to do a few things to accomplish the resize that we want, so to make things cleaner and reusable, we’ll wrap all our logic into a new class which we’ll call LogoResizer and store it in the LogoResizer.php file (place it under /src/LogoResizer/ folder).
namespace LogoResizer;

use Intervention\Image\ImageManagerStatic as Image;

class LogoResizer {

    private $desired_width;
    private $desired_height;
    private $desired_aspect_ratio;
    private $source_logo;
    private $resized_logo;

    public function __construct($desired_width = 300, $desired_height = 200) {
        $this->desired_width = $desired_width;
        $this->desired_height = $desired_height;
        $this->desired_aspect_ratio = $this->get_aspect_ratio($desired_width, $desired_height);
    }

    public function set_source_logo($source_image) {
        $this->source_logo = $source_image;
    }

    public function is_source_logo_valid() {
        $details = getimagesize($this->source_logo['tmp_name']);

        if($details === false) {
            return false;
        }

        return true;
    }

    public function get_resized_logo() {
        return $this->resized_logo;
    }

    public function resize_logo() {

    }

    private function get_aspect_ratio($width, $height) {
        return $width / $height;
    }
}
Let’s walk through the above code. Initially, we added a namespace, we created an alias (i.e. Image) for Intervention’s ImageManagerStatic, and created a constructor, a few functions, and a few private variables that will help us along the way.
The constructor is pretty straightforward; the two required variables are the desired width and height of the resulting logo (i.e. the one after the resize of the original). We also calculate the desired aspect ratio based on these values, using the get_aspect_ratio function.
The set_source_logo function is just a setter which accepts the uploaded logo. We could have that in the constructor as well, but it makes the class easier to reuse (without having to initialise it again). In the same manner, we could also have setters for the desired width and height, but I’ll omit them in this tutorial.
In the is_source_logo_valid function, we can add checks that will make sure that the logo is exactly what we need. In the above implementation, I just added a check to make sure that the logo is actually an image, but you can do whatever you want; e.g. check its MIME type, etc.
Another way to implement that, is to incorporate these checks to the set_source_logo function and make it either return true if the logo is ok, or false in case there is anything wrong with it.
We also added a getter function (i.e. get_resized_logo) which will return the resized logo. In a proper implementation, it will probably make sense to also add a save_resized_logo function that will save the logo in the file system, but in this tutorial, we’ll just show the resized logo (as soon as it’s done), so we will omit that.
Finally, we added a resize_logo function which -for now- is just a placeholder for the function which will hold our main logic.
Let’s move back to our logo-resize.php file and modify it (I will omit the HTML code; it will stay the same for the rest of the tutorial) to use this class.
require_once('vendor/autoload.php');

use LogoResizer\LogoResizer;

function get_resized_logo($logo) {
    $resizer = new LogoResizer(300, 200);
    $resizer->set_source_logo($logo);

    if(!$resizer->is_source_logo_valid()) {
        return false;
    }

    $logo_resized = $resizer->rezise_logo();

    if(!$logo_resized) {
        return false;
    }

    return $resizer->get_resized_logo();
}

if(isset($_FILES['logo'])) {
    $resized_logo = get_resized_logo($_FILES['logo']);

    if($resized_logo === false) {
        //show error
    } else {
        echo $resized_logo->response('jpg', 70);
        die();
    }
}
The get_resized_logo function initialises an object of our LogoResizer class, sets the uploaded logo as the source logo, checks if the source logo is valid, instructs our class to resize the logo, and finally -if the resize was performed successfully- returns the resized logo. In case of any error, it returns false. That’s enough for this tutorial, but in a real implementation you might want to return relevant error messages to let the user know what happened in case of an error.
So, if the user uploads a logo, we call the get_resized_logo to resize the original and get the resized logo back. In case of an error, we deal with it, and if the image came back correctly, we just display it to the user and kill the script. We do that using Intervention’s response function.
By the way, you might have noticed that although we use our LogoResizer class, we don’t include the path to it somewhere in the logo-resize.php file (like we do with composer’s autoload.php). Instead, we are auto-loading the class using composer. To do that, modify your composer.json file to look similar to the following:
{
    "require": {
        "intervention/image": "~2.1"
    },
    "autoload": {
        "psr-0": {
            "LogoResizer": "src/"
        }
    }
}
Obviously, what we did so far won’t work for now, since we have not yet implemented the resize_logo function of our LogoResizer class. Let’s do that now.
public function resize_logo() {
    try {
        $logo = Image::make($this->source_logo['tmp_name']);

         if($logo->width() === $this->desired_width && $logo->height() === $this->desired_height) {
            $this->resized_logo = $logo;
            return true;
        }

        $logo_aspect_ratio = $this->get_aspect_ratio($logo->width(), $logo->height());

        if($this->desired_aspect_ratio === $logo_aspect_ratio) {
            $logo = $this->resize($logo, $this->desired_width, $this->desired_height);
            $this->resized_logo = $logo;
            return true;
        }

        $background_colour = $logo->pickColor(0, 0, 'hex');

        if($this->desired_aspect_ratio > $logo_aspect_ratio) {
            $logo = $this->resize($logo, null, $this->desired_height);
        } else {
            $logo = $this->resize($logo, $this->desired_width, null);
        }

        $logo->resizeCanvas($this->desired_width, $this->desired_height, 'center', false, $background_colour);

        $this->resized_logo = $logo;
        return true;

    } catch (Exception $e) {
        return false;
    }
}

private function resize($logo, $width, $height) {
    $logo->resize($width, $height, function ($constraint) {
        $constraint->aspectRatio();
    });

    return $logo;
}
The first step in our resize_logo function is to initialise an instance of Intervention using the source logo. Then, we check if the logo has already the desired dimensions. If so, we copy it to the $resized_logo variable (so we can grab it using our relevant getter) and stop the process returning true; we wrap everything we do in this function in a try catch statement, returning false if an exception is thrown and true in case of a success.
The next step is to calculate the aspect ratio of the source logo, and compare it to the desired ratio.
The easy case is when the two ratios are equal, where we just have to resize the logo to the required dimensions using our resize function (which is basically a wrapper for Intervention’s homonymous function) and stop the process.
If they are different, we will resize the logo only specifying either the new -desired- height in case the desired aspect ratio is larger than the ratio of the source logo, or the desired width if it’s the other way around. As you may have noticed, our resize function resizes the logo keeping the aspect ratio, so by doing what we just described we will end up with a logo which has only one of its dimensions set correctly.
To fix that, we will just need to resize the logo canvas to the desired with and height, set all the content that we already have to its centre, and use colour of the top left corner (0x0 pixels) of the logo as the background colour of the canvas.
To further understand why we needed to do that, let me give you a quick visual example. Let’s assume that we will use the following image as a logo (its original dimensions are 1022×766 pixels):
![]()
The desired aspect ratio (of 300×200 pixels) is 1.5 and the aspect ratio of the uploaded image is ~1.33, so based on our code we will resize the logo specifying that the new height should be 200px, but leaving the width to be calculated automatically so we can keep the aspect ratio intact. That will result in a 267×200 pixels logo.
Then, we will resize the canvas of our logo to 300×200 pixels, and put our 267×200 logo at its centre. Have a look at the following image to visualise why.
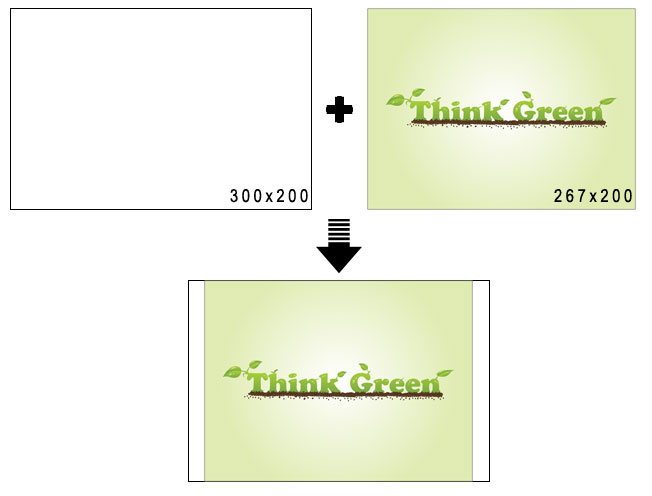
Finally, we just have to set the background colour of the canvas to #e1ecb4, so it will blend nicely with the rest of the logo.
![]()
You can download the source code of this tutorial from this Gist.